
The 'Active and Pending' room is where you, the healthcare provider, will view and access your patient consultations.
Two types of patient consultations are available:
Option 1: 'Video' Consultations
Option 2: 'Phone' Consultations
Other helpful articles:
Manage The 'Active and Pending' Room
Private Message a Patient Before Their Consultation Begins
Option 1: Video Consultation
Step 1 - If you are connected with more than one clinic or location, choose the correct clinic/location from the drop-down under 'Select Clinic'. If you only work out of one clinic, this drop-down will not appear.
You can find and enter your consultations in two different ways:
Option A: From the Navigation bar >Consultations > Active and Pending
Option B: From the Schedule
Option A: From the Navigation bar > Active and Pending
Step 1 - From the left navigation bar, click 'Consultations', then 'Active and Pending'.
You will see today's scheduled patient consultations and/or video meetings.
SECTIONS:
Active - Consults you have entered and started communicating in. These include:
- Completed consults you have marked as 'Archived' (red)
- Active consults that are complete but not yet marked by you (green)
- Patient Requested to Close the consultation (red)
Pending - Consults scheduled into your day. These include:
- 'Patient is Ready' (green)
- 'Waiting for Patient' (gold)
- 'Scheduled Video Meeting' (pink)
- 'Patient Cancelled' (red)
COLORS:
Red - Completed 'Archived' consults. These consults will remain in the 'Active and Pending' room for approximately 3 hours. After the 3 hours, they will drop from this screen and move to the 'Completed' screen.
Note: Completed consults marked 'Pending' will drop from this screen and move to the 'Waiting for Follow-Up' screen. It is recommended that all consultations be 'Archived' and any follow-up requirements be managed using the clinic's EMR system.
Green - Patients who have arrived and are ready for their consult - 'Patient Ready'
Gold - Patients who have not yet arrived for their consult - 'Waiting for Patient'
Pink - Scheduled Video Meetings
The patient will receive appointment notification(s) and reminders. These can be set by your clinic at 5 minutes, 15 minutes, 1 hour and/or 1 day before. After logging into their account, they will mark themselves as 'Ready' and their status in your 'Active and Pending' room will automatically update to 'Patient is Ready'.
Step 3 - When you are ready, click 'Enter Consultation'.

Step 4 - To start your appointment with your patient, click 'Enter Consultation' at the top of the chat area.
Note: the patient will not realize you are in the consult nor can you message the patient until you do Step 4. This gives you a chance to review the consult info ahead of time, as well as leave the consult and return later.
'Alert Patient' Feature: This feature allows healthcare providers or their office administrator/support to send a quick message within the consultation. The alert message gets pushed to the patient via text or a chat message in the consultation itself.
With virtual consultations, distractions can happen that can prevent a patient from arriving on time for their appointment. They may even indicate they are ready, then are absent when you arrive, or they could go silent during the consultation.
Step 5 - After you confirm that the patient is in a private and quiet setting and you have their permission to proceed with the video consultation, click the ‘Video Chat’ button along the top of the consultation.
Step 6 - Check ![]() to enable your microphone, camera and remember your preferences (optional)
to enable your microphone, camera and remember your preferences (optional)
Note: You may prevent certain participants from joining the video by clicking 'Prevent Other Consultation Participants From Joining', then unchecking their name. You can start as many videos during the active consultation as necessary, adding and preventing participants as desired.
When ready, click 'Start Video Chat'.
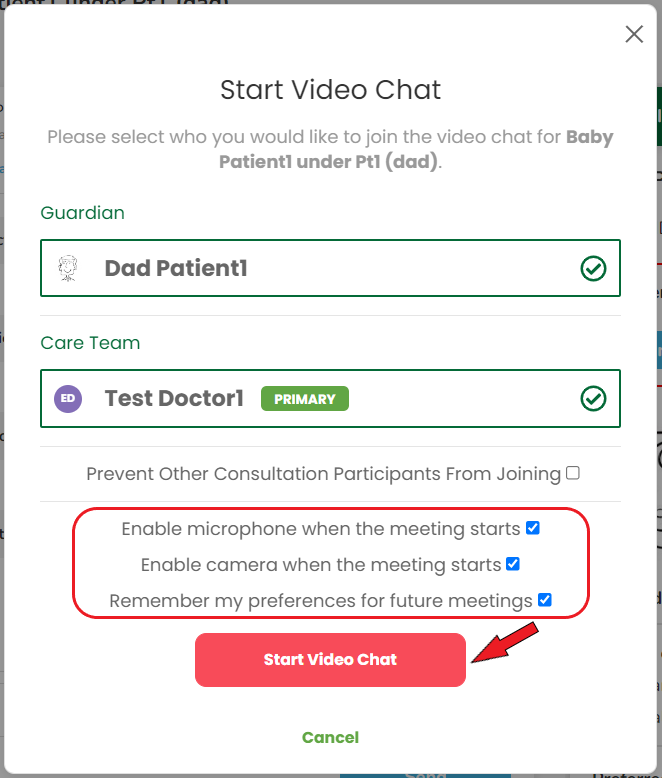
You will be taken directly into the video. Once your patient enables their video and audio, they will arrive in the video.
Step 7 - If other participants have been invited, you will be prompted to allow or deny them access.
Option B: Through the Schedule
Step 1 - From the left navigation bar, click 'Schedule'
Step 2 - Choose what view you would like to see your schedule
Step 3 - Click on the appointment that you would like to enter. From here choose 'Enter Consultation'. This will take you into the consultation.
Step 4 - To start your appointment with your patient, click 'Enter Consultation' at the top of the chat area.
Note: the patient will not realize you are in the consult nor can you message the patient until you do Step 4. This gives you a chance to review the consult info ahead of time, as well as leave the consult and return later.
Step 5 - After you confirm that the patient is in a private and quiet setting and you have their permission to proceed with the video consultation, click the ‘Video Chat’ button along the top of the consultation.
Step 6 - Check ![]() to enable your microphone, camera and remember your preferences (optional)
to enable your microphone, camera and remember your preferences (optional)
Note: You may prevent certain participants from joining the video by clicking 'Prevent Other Consultation Participants From Joining', then unchecking their name. You can start as many videos during the active consultation as necessary, adding and preventing participants as desired.
When ready, click 'Start Video Chat'.
Step 7 - If other participants have been invited, you will be prompted to allow or deny them access.
Option 2: Phone Consultation
There are some important benefits to phone consultations using this platform:
- A record of the phone consult is stored and attached to the patient's record.
- Patient's may be having technical difficulty getting the video to work.
- The phone call uses an actual phone line, not voice-over Internet (VoIP), so works when internet bandwidth is poor.
- The healthcare provider's phone number is kept hidden.
Step 1 - Follow 'Option 1 - Steps 1 to 4 or 5' above.
Step 2 - After you have the patient's permission to proceed with the phone consultation, click ‘Phone Call’ at the top of the consultation chat area.
Step 3 - The patient phone number will automatically generate from the information they entered into their account profile. If no number comes up, you can type their number in. Type in your landline or cell number (your number remains hidden from the patient), then click 'Start Phone Call'.
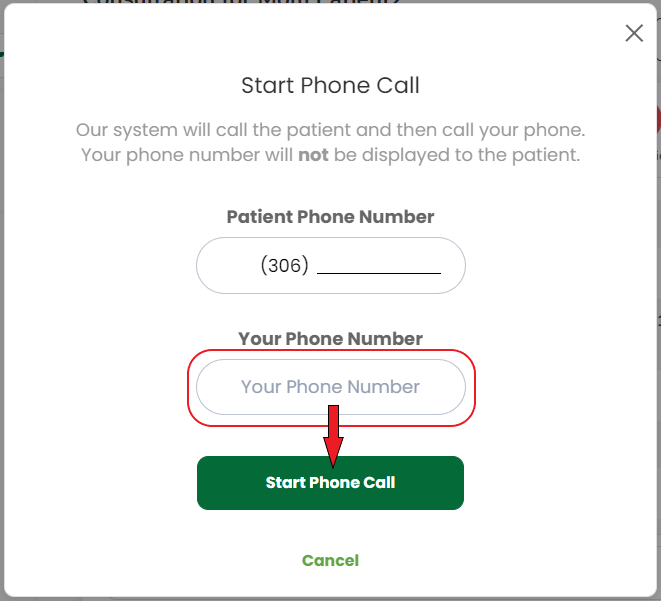
The system will call the patient first, then ask them to remain on the line and wait for you. It will then immediately call your phone.
Helpful 'Alert Patient' Feature
Step 1 - From within the consultation, if the patient does not respond to your introduction message (or stops responding to you), click the red 'Alert Patient' button.
Step 2 - Enter a brief, generic message to alert the patient, remembering not to use personal information (no names or health issue) to ensure privacy. i.e. "Please enter the consultation for your appointment."
Step 2 - Check ![]() :
:
- 'Push Notifications' (sends alert message to consultation chat. If patient has 'notifications' enabled for the SK Virtual Visit app, they will also hear an alert.)
- 'Sms' (sends alert text to patient's cell phone).
Step 3 - Click ' Alert Patient'.

Your patient will receive the alert message.
Comments
0 comments
Article is closed for comments.